Groundworks · 15 MINUTE CPD
Engineered Fill: Evidence Beneath the Surface
Why an even surface and a roller-pass count cannot replace a project-specific earthworks specification and traceable verification.

Your 15-minute plan: spend 10 minutes reading and examining the three teaching graphics, 3 minutes on the site scenario and knowledge checks, and 2 minutes on reflection.
Scope: UK construction inspection awareness. Apply the project requirements and rules for the relevant jurisdiction. Approved Documents M and T cited in this set apply to England; HSE CDM guidance concerns Great Britain.
1. A tidy surface conceals the work
Engineered fill is placed to meet defined requirements. Its appearance alone cannot establish how material was selected, laid or compacted. A smooth final surface may hide variable layers, wet pockets or areas missed by the agreed method. Inspect the process while each stage remains accessible.
Start with the earthworks design and specification, including the applicable document versions and project amendments. Standards for Highways provides highway contract documents, but their requirements do not automatically apply to every building site. Confirm the actual contractual basis. Avoid using a familiar historical document title as evidence that you hold the current project requirement. Source 1
2. Material and moisture come first
A method suitable for one fill may be unsuitable for another. Establish the approved source, material classification and required testing. The testing provider CTS describes laboratory checks on properties including grading, plasticity and moisture, alongside site verification methods. These tests answer different questions about suitability and performance. Source 2
Inspect deliveries and stockpiles for unexpected changes, segregation or contamination. Record weather and handling conditions that could affect the material. If a material becomes unsuitable after rainfall, repeating the planned roller passes may not solve the problem. Ask the responsible earthworks specialist to determine the appropriate response rather than inventing a drying or blending method.
3. Verify the lift, not just the machine
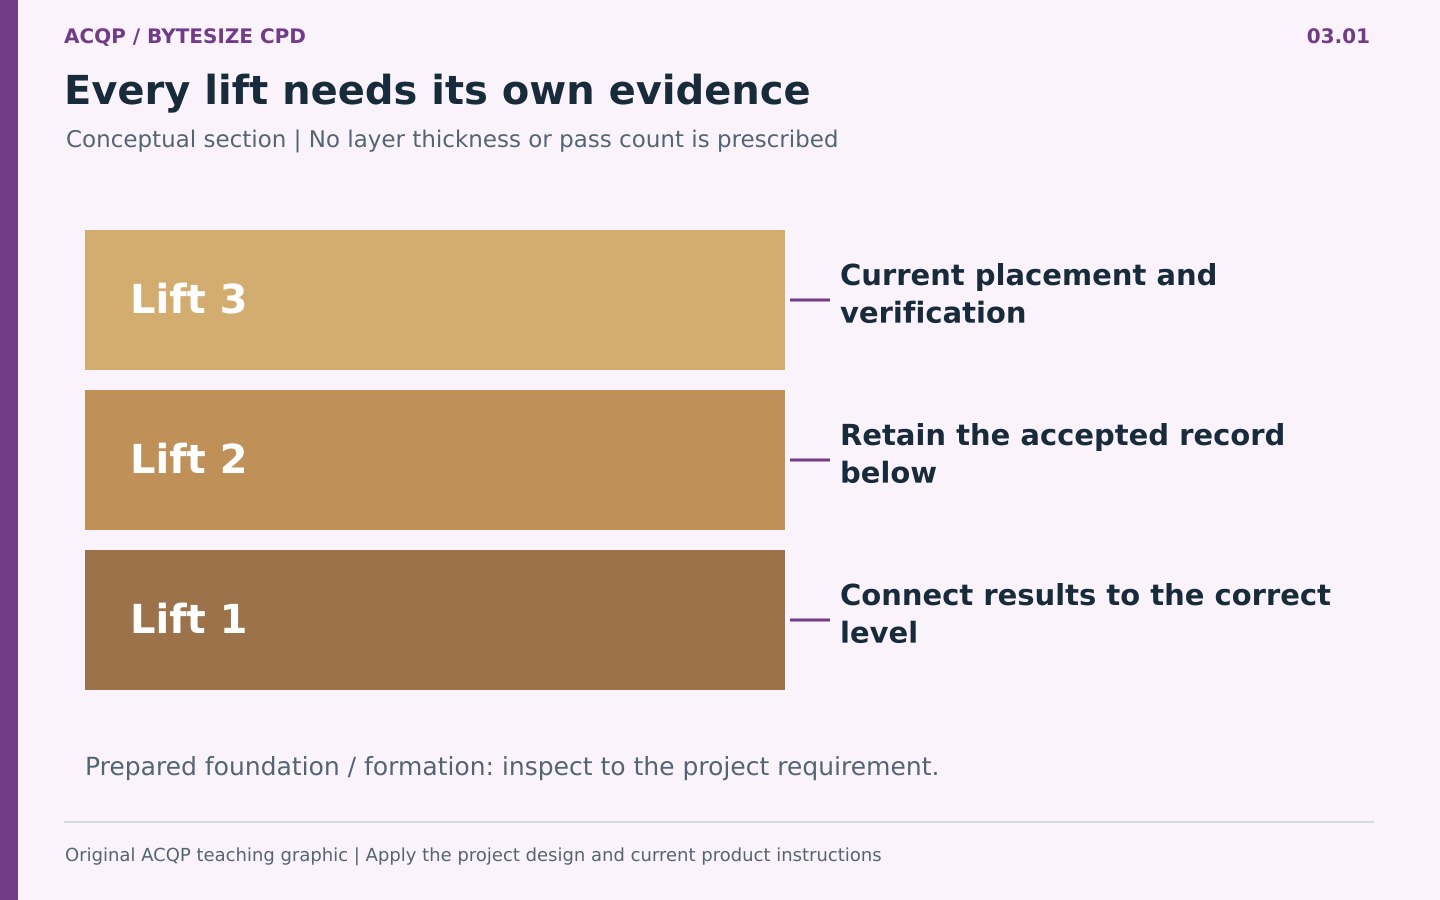
The placement method needs to connect material, layer thickness, equipment and compactive effort. Our layered diagram shows why a record must identify each lift. It deliberately gives no universal thickness or pass count: these belong to the approved method and material conditions.
Observe how the layer is spread and how edges, corners and obstructions are treated. A roller operating in the centre of an area does not demonstrate adequate treatment beside a retaining structure or service trench. Confirm safe access and exclusion arrangements before observing plant. Inspectors should not enter the operating zone to obtain a better photograph.
4. Know what the test establishes
A density result, a bearing-related result and a stiffness-related result are not interchangeable simply because each is labelled a ground test. Confirm the method, purpose, acceptance criterion, test depth or zone of influence and who interprets the result. The designer or earthworks specialist should resolve any proposed change in verification method.
The illustrative test-location map shows recorded, pending and review locations. These are evidence states, not a geotechnical acceptance classification. A test at one position does not prove every nearby area acceptable. The extent and frequency of verification should follow the specification and a reasoned inspection plan, including changes in materials or conditions.
5. Retain the three-dimensional record
A useful test reference includes the area, coordinates or chainage, lift or level, date, material and associated placement record. A map with dots but no levels may accidentally combine results from different layers. Preserve laboratory references and any limitations on the test.
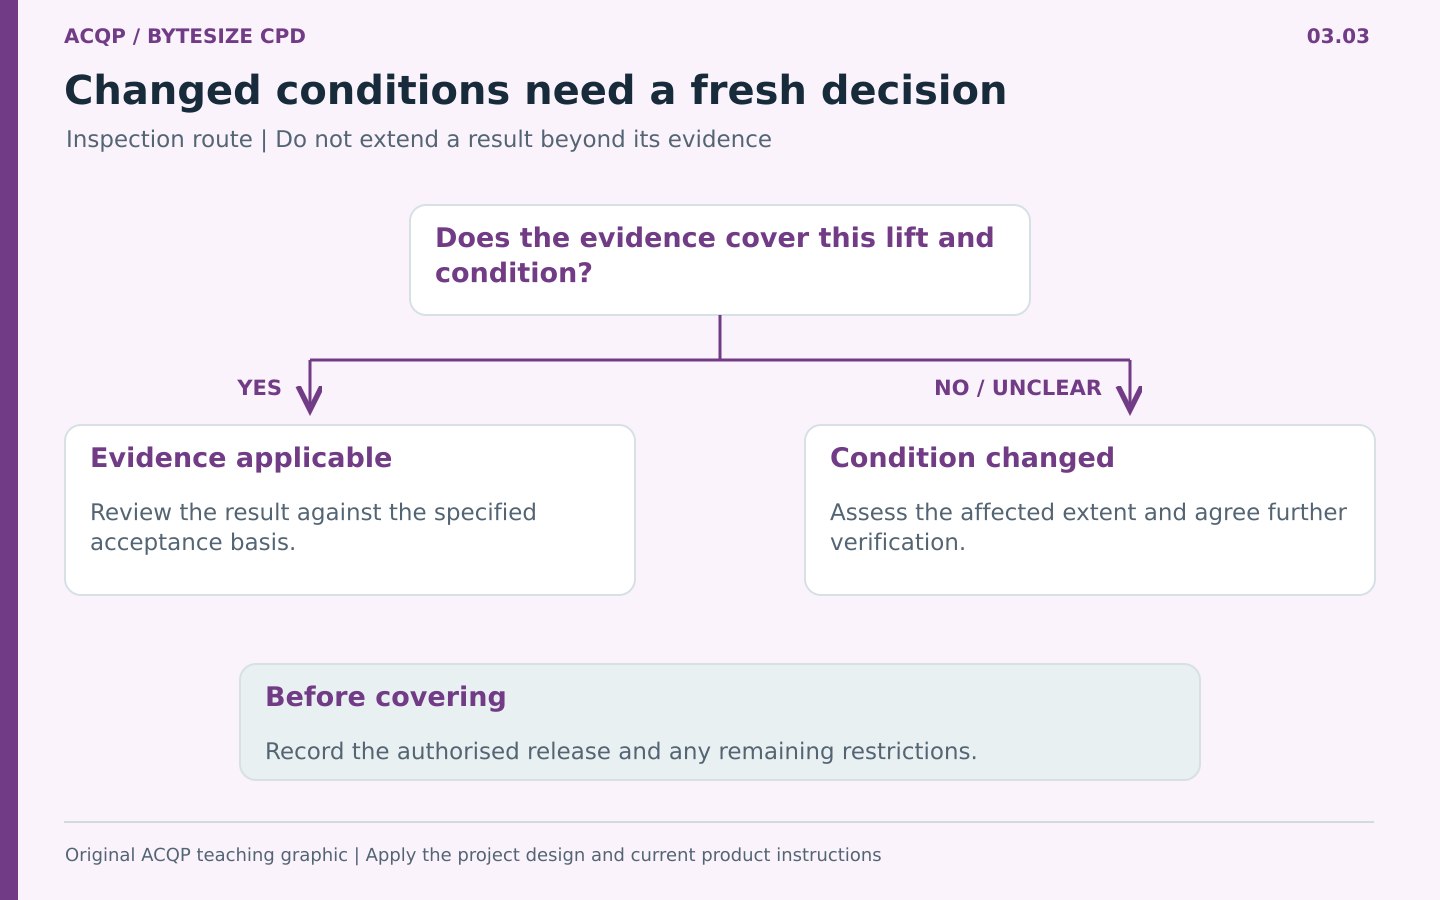
For a nonconforming result, identify the affected area and the investigation or remedial decision. Link any replacement, reworking and retest to the original concern. A later favourable test should not simply erase the earlier result. Before covering a lift, record who accepted the evidence and any restrictions that remain. Our decision graphic follows this route from observation to an authorised release.
6. Three-minute site scenario
Rain falls overnight onto a prepared fill layer. The following morning, the roller leaves visibly soft tracks near one corner. Yesterday's test sheet records satisfactory results elsewhere at the same nominal level.
Your decision: can yesterday's result release the whole area today?
Suggested response: record the changed condition and location, notify the earthworks lead and prevent premature covering of the affected area through the agreed controls. The specialist should assess the extent, material condition and necessary treatment or verification. Retain yesterday's evidence, but do not extend it beyond what it actually demonstrates.
7. Check your understanding
Does a smooth surface demonstrate satisfactory fill? No. It provides only a limited visual observation.
Are all ground-test results equivalent? No. Methods assess different properties and require the correct acceptance basis.
Why record the lift or level? To connect the result to the material layer actually tested.
Your practical takeaway: inspect and record each layer before the next one removes access.
Sources and further reading
- Standards for Highways: MCHW
Official source for applicable highway contract specifications and versions. - Construction Testing Solutions: earthworks testing
Testing provider explains material classification and laboratory and site verification.
Prepared by the ACQP Training Centre. Public sources checked on 25 September 2026. Use the applicable project design, current product instructions and relevant standards. Record the time you actually spend.